WIV MCP Server
Connection & Setup Guide
Version 4.2 | February 2026
Overview
The WIV MCP Server allows AI-powered IDEs and assistants (Cursor, VS Code, Claude, ChatGPT) to interact with your WIV workflow management platform. It uses the Model Context Protocol (MCP) standard to expose WIV tools like listing workflows, managing cases, running executions, and more.
Authentication is handled via PropelAuth OAuth 2.1. After signing in, an API key is generated for your organization and used for all subsequent requests.
How the Connection Flow Works
The https://mcp.wiv.ai page provides a simple sign-in flow that generates a pre-configured connection for your IDE or AI assistant.
Architecture
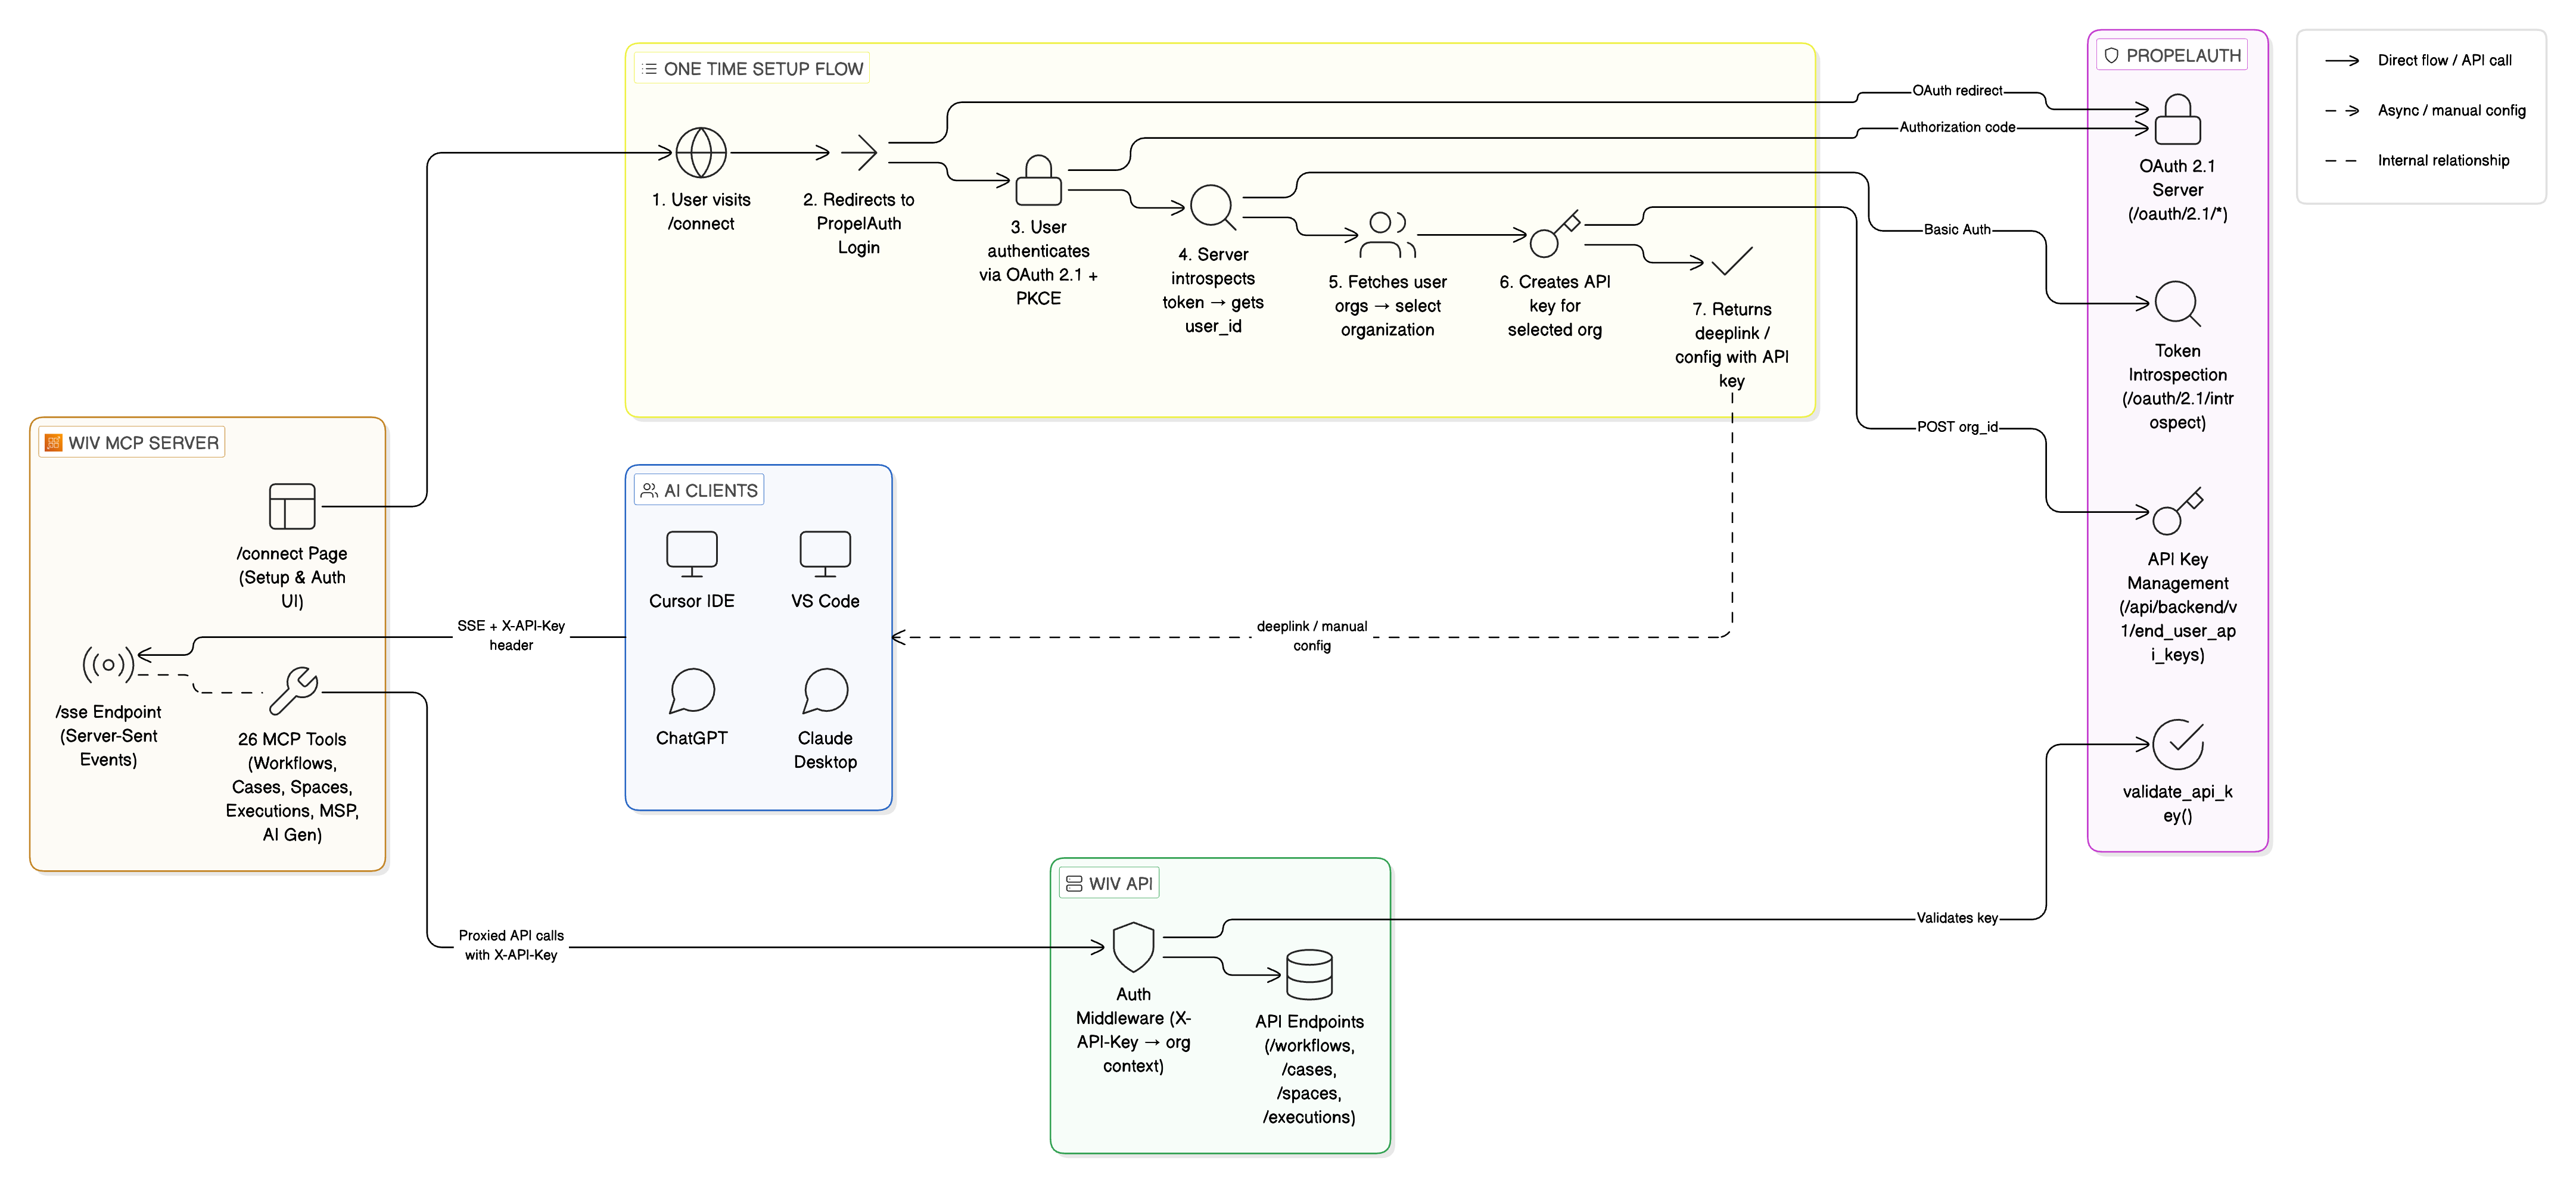
The system has three main components:
WIV MCP Server — hosted on AWS App Runner, serves SSE (Server-Sent Events) endpoint for MCP communication
PropelAuth — handles OAuth 2.1 authentication, user management, and API key lifecycle
WIV API — the backend API that the MCP server proxies requests to, using the generated API key
When an IDE connects to the MCP server's /sse endpoint with an X-API-Key header, the server forwards requests to the WIV API with the same key. PropelAuth validates the key and resolves the organization context.
Setup Instructions
Cursor
Option A: One-click install
Visit the https://mcp.wiv.ai page and sign in.
Click "Open in Cursor" — this opens a deeplink that auto-configures the MCP server.
Cursor will prompt you to confirm the installation.
Option B: Manual setup
Add the following to your .cursor/mcp.json file:
{
"mcpServers": {
"wiv": {
"url": "https://mcp.wiv.ai/sse",
"headers": { "X-API-Key": "<your-api-key>" }
}
}
}
VS Code
Option A: One-click install
Visit the /connect page and sign in.
Click "Open in VS Code" — uses the vscode:mcp/install deeplink.
VS Code will prompt you to confirm.
Option B: Manual setup
Open VS Code Settings (JSON) and add the MCP server configuration, or add it to .vscode/mcp.json in your workspace.
Claude Desktop / Claude.ai
Claude.ai (Pro/Max/Team/Enterprise):
Go to Settings → Connectors → Add custom connector.
Paste the MCP server URL (e.g., https://mcp.wiv.ai/sse).
Complete the OAuth sign-in when prompted.
Enable the WIV connector in your chat via the "+" button → Connectors.
Claude Desktop:
Add to your claude_desktop_config.json:
{
"mcpServers": {
"wiv": {
"command": "npx",
"args": [
"mcp-remote",
"https://mcp.wiv.ai/sse",
"--header",
"X-API-Key: <your-api-key>"
]
}
}
}
Restart Claude Desktop after saving.
ChatGPT
Requirements: ChatGPT Pro, Plus, Team, or Enterprise with Developer Mode enabled.
Go to Settings → Connectors → Advanced settings and enable Developer Mode.
Click Add new connector (or Settings → Apps & Connectors → Add).
Enter name: WIV and paste the server URL.
Click Create and complete the OAuth sign-in.
In a new chat, enable the WIV connector via "Add sources" or the connectors menu.
Note: ChatGPT uses OAuth for authentication. API key headers are not supported for ChatGPT connectors — use the OAuth flow instead.
Available MCP Tools
Once connected, the following tools are available to your AI assistant:
Security Notes
API keys are scoped to a single organization and cannot access other tenants.
Keys are created via PropelAuth's Backend API and follow the same lifecycle as manually-created keys.
The MCP server does not store tokens or keys — they are passed through to the WIV API on each request.
HTTPS is enforced for all connections (AWS App Runner with TLS).
OAuth 2.1 with PKCE is used for the authentication flow.
Troubleshooting
Connection refused or timeout
Ensure the MCP server URL is correct and includes /sse at the end. Check that your network allows outbound HTTPS connections.
401 Unauthorized
Your API key may have expired or been revoked. Visit /connect to generate a new one.
Tools not showing up
In Claude.ai, enable the connector in your chat. In Cursor/VS Code, restart the IDE after adding the configuration. In ChatGPT, ensure Developer Mode is enabled.
Wrong organization data
If you see data from the wrong organization, visit https://mcp.wiv.ai again and select the correct organization during the setup flow.
Was this article helpful?
That’s Great!
Thank you for your feedback
Sorry! We couldn't be helpful
Thank you for your feedback
Feedback sent
We appreciate your effort and will try to fix the article